Adapter Setup in LEDNet
Once you have set up your adapter(s) in Windows, they now need to be added to the LEDNet software.
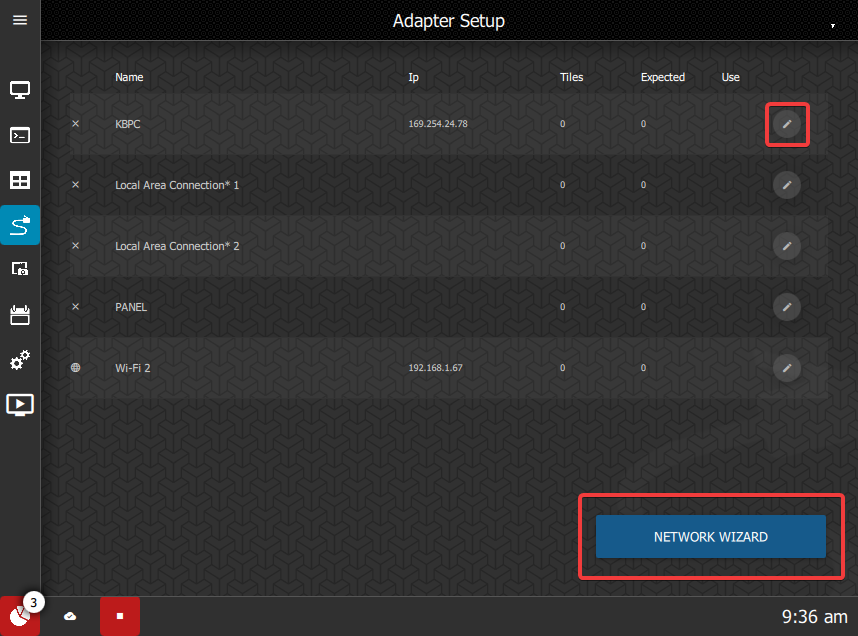
First, open LEDNet and navigate to the Adapter Setup screen using the icon in the left-hand menu:

Click the Network Wizard button to find the adapter, or adapters, that have tiles connected and click Next.
Or if your adapter is already showing in the list, you can click the edit button and skip to Flow Control.
Ensure that the system has identified the correct number of tiles on the adapter. If the number of tiles found does not match the physical number of tiles, click the Retry button.
Once the correct number of tiles is shown, click the Test button. If you need to prompt the system to try again you can go back and click Retry or Test.
Click the Confirm button.
Turn the Use Adapter toggle on to activate this adapter. You will then be able to access additional details for the adapter.
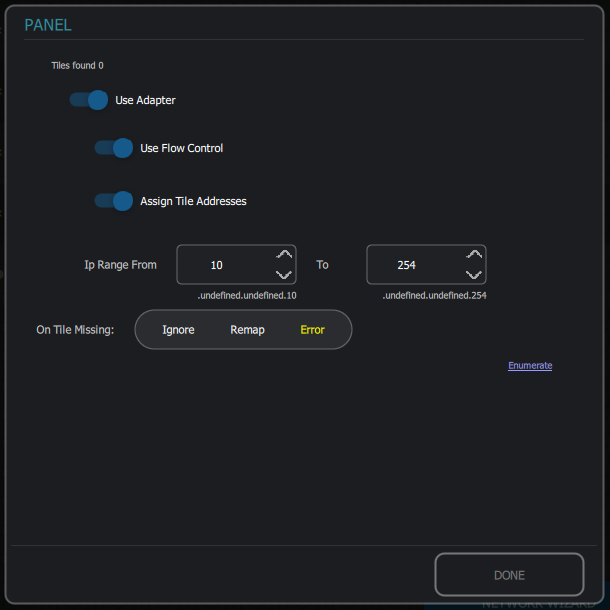
Flow Control
This is a method of distributing the data packets evenly so that they don't overload the network switch and cause packets to be dropped. This setting should be turned on by default.
Assign Tile Addresses
This should generally be switched on. If you are using your own DHCP server, you may choose to turn it off. Note that if tile addresses cannot be assigned then it can prevent enumeration from being successful.
IP Range
This is the range of addresses that tiles can be assigned to. They are assigned from lowest to highest. The IP range should be populated based on the Windows settings and you should not need to change this.
On Tile Missing
The On Tile Missing has 3 modes. Generally, you should leave it on Error mode which will ensure that the screen doesn't start with blank tiles. Both Ignore and Remap override the auto-enumeration so should only be used when you are having tile issues.
- Ignore - Will ignore a blank tile and force the screen to start. You might wish to use this if you have a blank tile and are waiting for a replacement but still want the screen to start.
- Remap - Uses settings from last successful enumeration to determine where to place the tiles. This can be useful if a tile has stopped communicating and you can't replace it.
- Error - Ensures that auto-enumeration doesn't succeed until the correct number of tiles are showing. It also allows for auto-enumeration after a power outage.
Enumerate
The Enumerate button allows you to check the tiles on this adapter after you have changed settings.
Generally, these settings should be set by the Wizard and you don't typically need to change them.
Click Done to return to the Adapter Setup screen. Once you have set up the adapters you need, the screens must be set up in the ON Cloud Platform before you can continue with the set up in LEDNet.