Adapter Setup in Windows
The following steps should only need to be completed once when the screen is initially installed.
First, the adapters need to be setup on the PC after the screens are installed. It's very important that it's done correctly as the tiles will simply not show, or a cable will appear to be disconnected if it's not done properly. There can also be intermittent networking issues that cause enumeration failures if the setup is not correct.
There are different properties required depending on the number of tiles for the screen.
If you are familiar with managing networks, these are the changes that need to be made:
- Make sure DHCP is not enabled by setting a static IP address
- IP address should be 192.168.30.1 and the Subnet mask should be 255.255.255.0
- If your screen has more than 250 tiles it needs a Class B domain so the IP Address should be 172.16.10.1
- Speed & Duplex needs to be set to Auto Negotiation
- It's recommended the adapter is renamed to something meaningful
- Uncheck all protocols and services except IPv4
Setup for a Small Screen (100 tiles or less) With No Switch
These instructions apply to small screens with a single cable going straight to the first tile with no switch between the PC and the tile.
Navigate to the Windows Adapter Settings. This can be found by clicking the Windows icon and typing "settings". From there, click "Network & Internet" and under the heading "Change your network settings", click "Change Adapter Options".
Right click the adapter name and select Properties. If you are asked whether you want to allow this app to make changes to your device, click Yes. (It may require the admin password depending on the user accounts setup.)
In the Properties window, there is a list of items which will have default settings applied to it. Untick everything in the list except "Internet Protocol Version 4 (TCP/IPv4)". This is done to minimise traffic to the tiles as they do not need any of the other services listed.
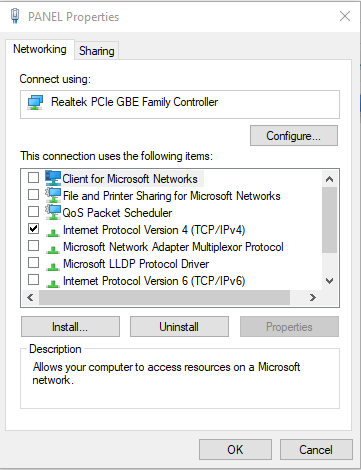
In that list, click on "Internet Protocol Version 4 (TCP/IPv4)" and click the Properties button. Turn off the "Obtain an IP address automatically" function, which is the DHCP setting. Change it to "Use the following IP address" and input a local domain such as 192.168.30.1, making sure to keep it low. Set the Subnet mask to 255.255.255.0 and leave the Default gateway blank.
Turn off the "Obtain DNS server address automatically" and change it to "Use the following DNS server addresses" but leave the DNS server fields blank. Click OK to close the window.
Click the Configure button. Click Yes to proceed.
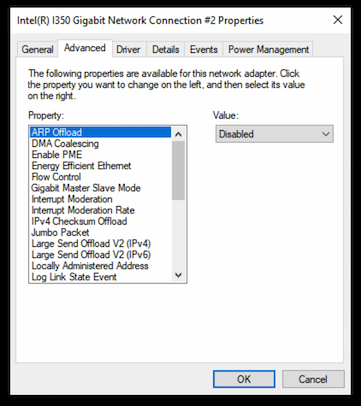
Navigate to the "Advanced" tab and click the "Speed & Duplex" property. Ensure it is set to "Auto Negotiation".
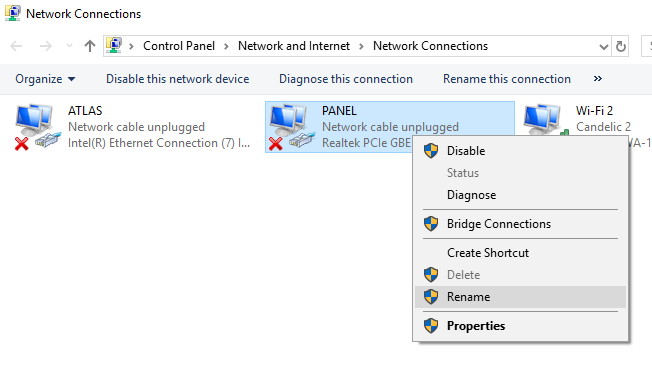
Open the Network Connections window if you did not access the settings from there. Rename your adapter to something that will be meaningful. For example, you might use it to indicate the location of the tiles that are on the adapter. Right-click the icon and select Rename.
Once you have set up the adapters in Windows, they can then be set up in LEDNet.
Setup for a Screen (of any size) With a Switch
These instructions apply to screens that utilise a switch between the PC and the tiles. Please see variation for screens with more than 250 tiles in step 4.
Navigate to the Windows Adapter Settings. This can be found by clicking the Windows icon and typing "settings". From there, click "Network & Internet" and under the heading "Change your network settings", click "Change Adapter Options".
Right click the adapter name and select Properties. If you are asked whether you want to allow this app to make changes to your device, click Yes. (It may require the admin password depending on the user accounts setup.)
In the Properties window, there is a list of items which will have default settings applied to it. Untick everything in the list except "Internet Protocol Version 4 (TCP/IPv4)". This is done to minimise traffic to the tiles as they do not need any of the other services listed.
In that list, click on "Internet Protocol Version 4 (TCP/IPv4)" and click the Properties button. Turn off the "Obtain an IP address automatically" function, which is the DHCP setting. Change it to "Use the following IP address" and input a local domain such as 192.168.30.1, making sure to keep it low. Set the Subnet mask to 255.255.255.0 and leave the Default gateway blank.
If your screen has more than 250 tiles, you need to set a Class B domain. Please use 172.16.10.1 as the IP address in the Properties window. The Subnet mask should be 255.255.0.0 and the default gateway can remain blank.
Turn off the "Obtain DNS server address automatically" and change it to "Use the following DNS server addresses" but leave the DNS server fields blank. Click OK to close the window.
Click the Configure button. Click Yes to proceed.
Navigate to the "Advanced" tab and click the "Speed & Duplex" property. Select "Auto Negotiation" from the Value dropdown menu. Click Ok to close the window.
Open the Network Connections window if you did not access the settings from there. Rename your adapter to something that will be meaningful. For example, you might use it to indicate the location of the tiles that are on the adapter. Right-click the icon and select Rename.
- Using the interface for your switch, limit the speed on all ports going to tiles to "100 Mbps" and set duplex to "Full". The port going to the PC should not be speed limited, but should be set to Full Duplex.
Once you have set up the adapters in Windows, they can then be set up in LEDNet.
Advanced Adapter Settings
The following advanced adapter settings can be set to further reduce unnecessary traffic and increase network stability by preventing certain driver behaviour. These settings will need to be applied to each adapter used by tiles individually. A script is also available below to perform this task.
Using these settings has resulted in significant improvement with large screens in particular. Symptoms such as visually choppy transitions between content and inconsistent Vsync drops have since resolved.
note
When using the following settings, Flow Control must be enabled per adapter from within LEDNet, as Windows is no longer managing this.
| Setting | Value |
|---|---|
| ARP Offload | Disabled |
| DMA Coalescing | Disabled |
| Enable PME | Disabled |
| Energy Efficient Ethernet | Off |
| Flow Control | Disabled |
| Gigabit Master Slave Mode | Auto Detect |
| Interrupt Moderation | Disabled |
| Interrupt Moderation Rate | Off |
| IPv4 Checksum Offload | Rx & Tx Enabled |
| Jumbo Packet | Disabled |
| Large Send Offload V2 (IPv4) | Enabled |
| Large Send Offload V2 (IPv6) | Enabled |
| Locally Administered Address | Not Present |
| Log Link State Event | Disabled |
| Maximum Number of RSS Queues | 1 Queue |
| NS Offload | Disabled |
| Packet Priority & VLAN | Packet Priority & VLAN Disabled |
| Receive Buffers | 256 |
| Receive Side Scaling | Disabled |
| Reduce Speed On Power Down | Disabled |
| Speed & Duplex | Auto Negotiation |
| TCP Checksum Offload (IPv4) | Rx & Tx Enabled |
| TCP Checksum Offload (IPv6) | Rx & Tx Enabled |
| Transmit Buffers | 512 |
| UDP Checksum Offload (IPv4) | Rx & Tx Enabled |
| UDP Checksum Offload (IPv6) | Rx & Tx Enabled |
| Wait for Link | Auto Detect |
| Wake on Link Settings | Disabled |
| Wake on Magic Packet | Enabled |
| Wake on Pattern Match | Enabled |
Script
note
Requires elevation.
As admin, run the following PowerShell script:
$properties = @(
  ("ARP Offload", "Disabled"),
  ("DMA Coalescing", "Disabled"),
  ("Enable PME", "Disabled"),
  ("Energy Efficient Ethernet", "Off"),
  ("Flow Control", "Disabled"),
  ("Gigabit Master Slave Mode", "Auto Detect"),
  ("Interrupt Moderation", "Disabled"),
  ("Interrupt Moderation Rate", "Off"),
  ("IPv4 Checksum Offload", "Rx & Tx Enabled"),
  ("Jumbo Packet", "Disabled"),
  ("Large Send Offload V2 (IPv4)", "Enabled"),
  ("Large Send Offload V2 (IPv6)", "Enabled"),
  ("Locally Administered Address", "Not Present"),
  ("Log Link State Event", "Disabled"),
  ("Maximum Number of RSS Queues", "1 Queue"),
  ("NS Offload", "Disabled"),
  ("Packet Priority & VLAN", "Packet Priority & VLAN Disabled"),
  ("Receive Buffers", "256"),
  ("Receive Side Scaling", "Disabled"),
  ("Reduce Speed On Power Down", "Disabled"),
  ("Speed & Duplex", "Auto Negotiation"),
  ("TCP Checksum Offload (IPv4)", "Rx & Tx Enabled"),
  ("TCP Checksum Offload (IPv6)", "Rx & Tx Enabled"),
  ("Transmit Buffers", "512"),
  ("UDP Checksum Offload (IPv4)", "Rx & Tx Enabled"),
  ("UDP Checksum Offload (IPv6)", "Rx & Tx Enabled"),
  ("Wait for Link", "Auto Detect"),
  ("Wake on Link Settings", "Disabled"),
  ("Wake on Magic Packet", "Enabled"),
  ("Wake on Pattern Match", "Enabled")
)
$i = 1
while ($i -le 5) {
  foreach ($property in $properties) {
    try {
      $adapter = "Tiles $i"
      Write-Host "[$adapter] Setting $($property[0]) -> $($property[1])"
      Set-NetAdapterAdvancedProperty -Name $adapter -DisplayName $property[0] -DisplayValue $property[1] -ErrorAction Stop
    }
    catch {
        Write-Warning "Could not set property $($property[0]) on adapter $adapter."
    }
  }
  $i++
}